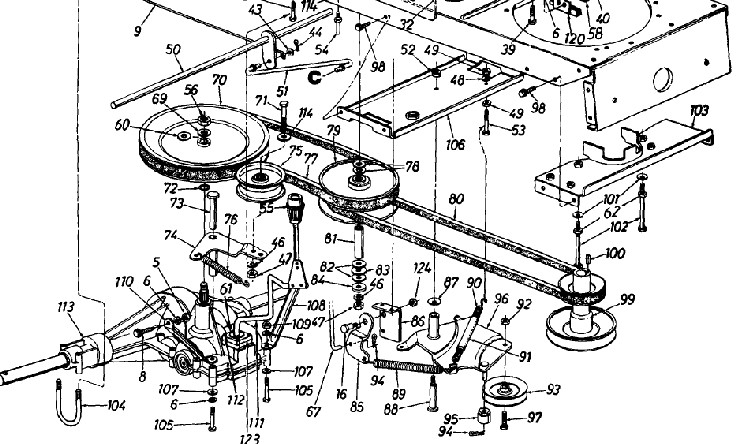
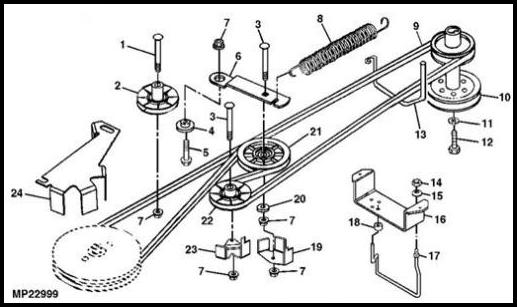
Riding Lawn Mower Belt Diagram – Belt diagrams are a must-have tool to comprehend the arrangement and routing of belts in different mechanical systems. They provide the design of belts around various components. This helps mechanics, engineers, and DIY-lovers when they work on HVAC systems, engines or other belt-driven equipment.
Types of Belt Diagrams
- Serpentine diagrams are utilized to design a single belt that is used to drive multiple devices such as an alternator, power steering pumps, or air cooling compressor.
- Timing diagrams demonstrate how a timing belt connects to the crankshaft. This helps ensure the proper timing of the engine’s valves.
- Vbelt diagrams show several V-shaped belts installed in older engines.
The key components of Belt Diagrams
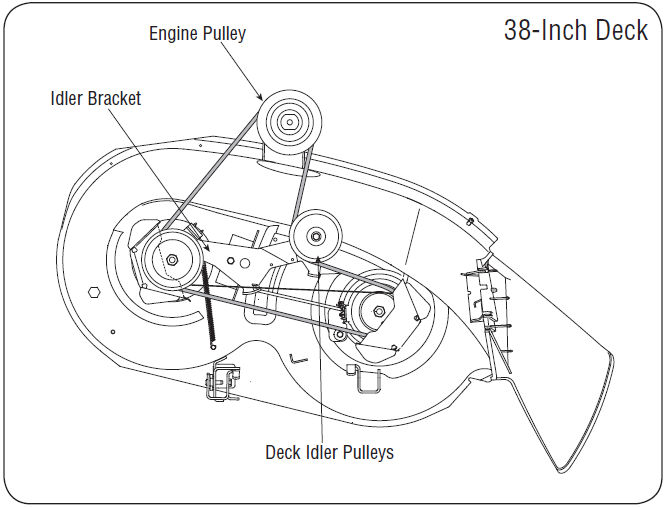
- A pulley is surrounded by a circle and belts that loop. It transfers energy from one part to the next.
- Belts are flexible bands that transmit power from pulleys to the ground.
- Tensioners keep the belt in a secure position to prevent it from sliding.
How to read a Belt Diagram
- Understanding symbols helps you identify the routing patterns and components in the schematic.
- Identification of key components like pulleys belts and tensioners lets users to visualize the layout of the system.
- Interpreting routing pattern reveals how the belt travels across it, and how it impacts different elements.
We’ve prepared a step by-step guide for creating belt diagrams:
- Gather important information Measure, describe and arrange components, belt(s) and their arrangement
- Sketch the Initial Layout Sketch out a sketchy plan of the system including each pulley and the position of the tensioner.
- Add Pulleys and Tensioners. Label each pulley’s component (e.g. power steering pump or alternator).
- The Belt Routing Diagram. Draw the belt route around pulleys.
- Review and refine your diagram: Check all of your work for accuracybefore making any necessary modifications to produce a clear, straightforward diagram.
Tips to Belt Diagrams
- With the appropriate software tools, making professional-looking diagrams can be made more efficient, quicker, and more cost effective.
- Accurately gathering accurate information from specifications of the manufacturer, service manuals or reliable online sources is vital to produce a precise and useful diagram of the belt.
- Double-checking the accuracy of your diagram before you send the finalized version guarantees security and helps avoid issues that may arise in the course of repairs.
Conclusion
Anybody who works with machines that are driven by belts must be able to draw belt diagrams. When you’re familiar with the different kinds of diagrams, their components and the best way to build them correctly will make you more prepared to tackle any project that involves pulleys or belts. Our tips and tricks can aid you in creating clear and precise diagrams to improve your efficiency.
Gallery of Riding Lawn Mower Belt Diagram


