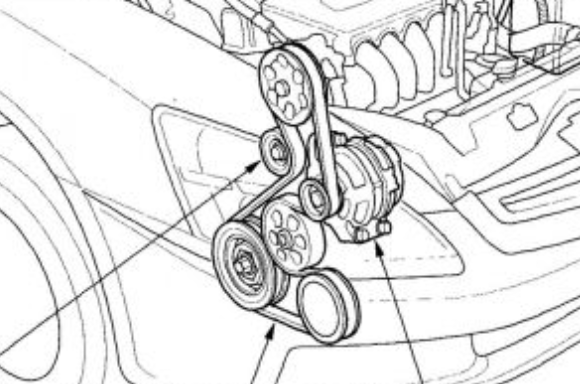
Honda Accord Serpentine Belt Diagram – Belt diagrams are essential tools to understand the layout and routing for belts in various mechanical systems. They are visual representations of how belts are positioned around components. This can be helpful for engineers, mechanics, and DIY enthusiasts working on HVAC systems, engines and other machinery driven by belts.
Types Of Belt Diagrams

- Serpentine Belt Diagrams can be utilized when a single continuous belt is operating multiple devices such an alternator, power steering pump, compressor for air conditioners, power steering pump and many more.
- Timing diagrams demonstrate how a timing belt connects to the crankshaft. This helps ensure the proper timing of an engine’s valves.
- V-belt diagrams illustrate the way that V-shaped belts are installed in older engines or other systems with specialized features.
Key Components in Belt Diagrams
- Pulleys are circular structures that loop around belts and transfer power from one component to the next.
- Belts can be described as elastic bands that transmit energy to pulleys.
- Tensioners maintain a proper tension on the belt in order to avoid sliding and ensure that it functions efficiently.
What do I need to know in order to read a belt diagram
- Understanding symbols helps you identify components and routing patterns in the form of a diagram.
- The identification of key components such as belts and pulleys lets you see the system’s layout.
- Interpreting routing pattern reveals how the belt moves through it and interacts with various components.
A step-by-step procedure for creating a belt chart:
- Important Info: Measure and specify components and belts accurately and arrange them correctly
- Sketch the initial layout. Sketch out a blueprint which shows the layout of the entire system. This includes the position of each tensioner and pulley.
- Add tensioners and pulleys. Label each pulley with its component (e.g. power steering pump, alternator).
- Draw the Belt Routing Chart The route is drawn by drawing the belt around the pulleys. Check to see if it follows any guidelines from the manufacturer or industry.
- Review and improve your diagram.
Tips and Tricks to Belt Diagram Design
- With the appropriate software tools, designing professionally-looking diagrams is more efficient, quicker, and cost-effective.
- It is vital to get accurate information from manufacturer specifications and service manuals in order to draw a helpful belt diagram.
- Double checking for errors prior to finalizing your drawing will ensure accuracy and solid. It also prevents problems or confusion when you are performing repairs or maintenance.
Conclusion
An understanding and ability to construct belt diagrams are crucial for anyone who works with belt-driven machines. You’ll be better prepared to tackle any task that requires pulleys or belts if you know the various types of diagrams as well as their components. Our tips and tricks can aid you in creating clear and precise diagrams that will help you work more efficiently.
Gallery of Honda Accord Serpentine Belt Diagram


